
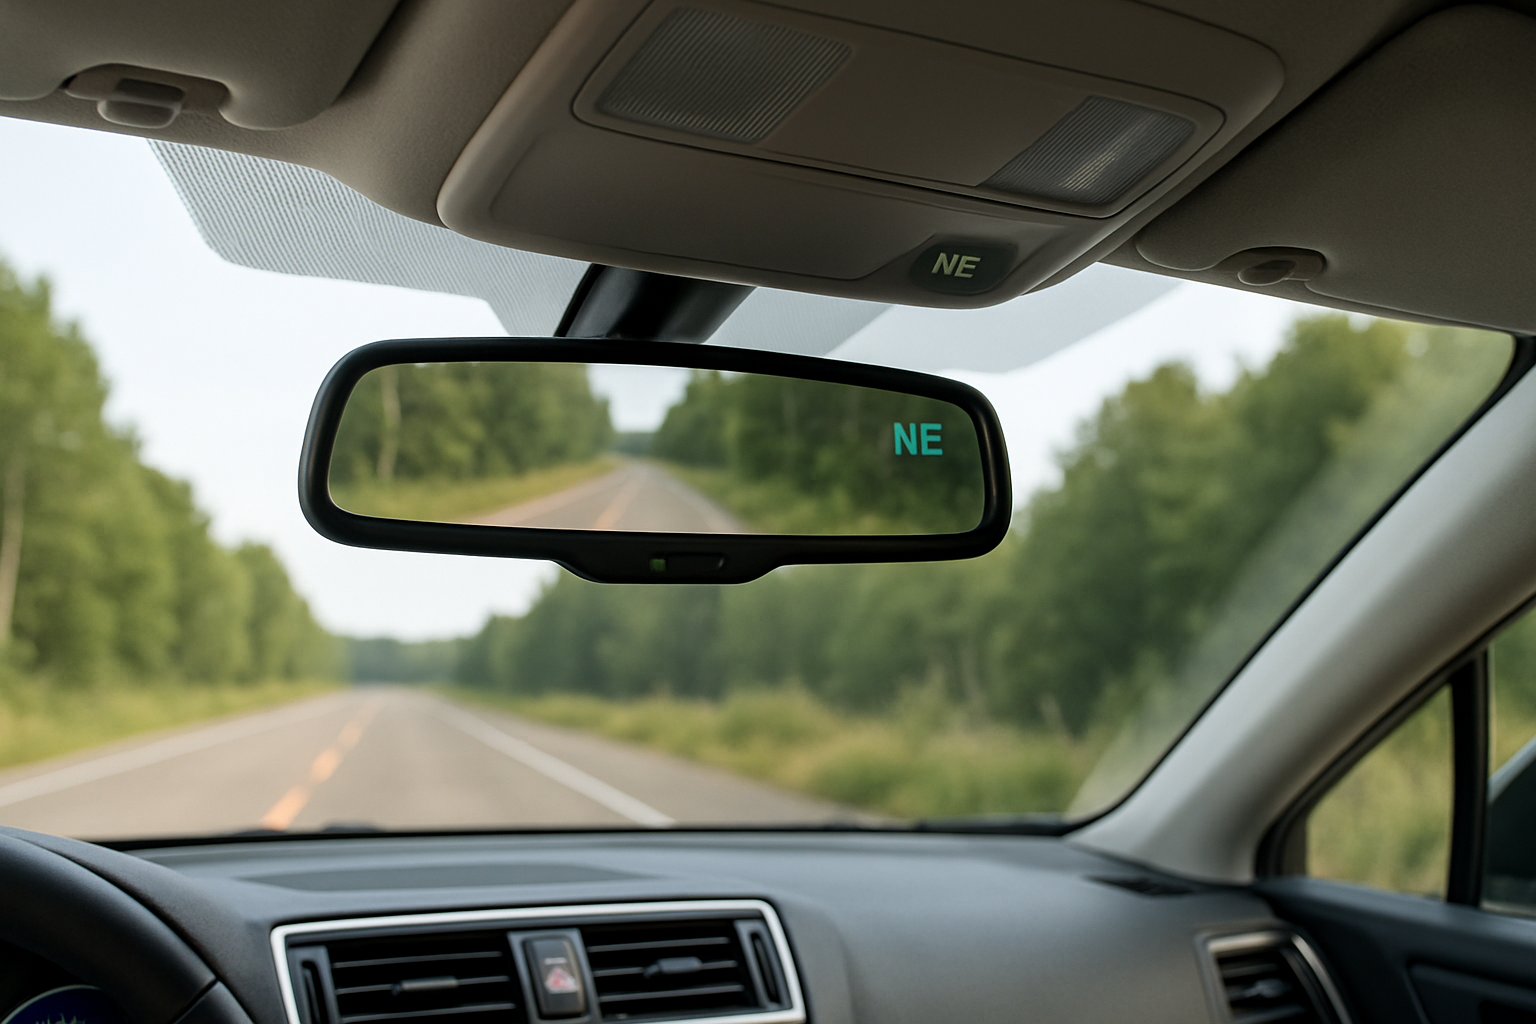
The Subaru Outback’s advanced mirror system combines several technologies that make driving safer and more convenient. Your auto-dimming rearview mirror automatically reduces glare from headlights behind you, while the built-in compass helps with navigation.
Many Outback drivers don’t realize their mirror has these features or don’t know how to use them properly. Understanding how to calibrate the compass, program HomeLink garage door buttons, and use the electrochromic dimming can significantly improve your driving experience.
Understanding Your Outback’s Auto-Dimming Mirror Technology
The auto-dimming feature uses electrochromic technology, which is essentially a special gel sandwiched between two pieces of glass in your mirror. When light sensors detect bright headlights behind you, the system sends a small electrical current through this gel.
This current causes the gel to darken gradually, reducing the intensity of reflected light by up to 90%. The process happens automatically within seconds and reverses just as quickly when the bright light source disappears.
Two sensors make this possible: one facing forward that measures ambient light conditions, and another facing backward that detects glare from vehicles behind you. The mirror only dims when it’s dark enough outside and when there’s a significant difference between the light levels detected by both sensors.
You’ll find the manual override button on the bottom of the mirror housing. Press this button to turn the auto-dimming feature on or off. A green LED indicator shows when the system is active.
Setting Up Your Compass System
Your Outback’s compass needs proper calibration to display accurate directional information. The compass reading appears in the upper right corner of your mirror when the ignition is on.
Understanding Magnetic Declination Zones
The United States is divided into 15 magnetic declination zones to account for the difference between magnetic north and true north. Your compass must be set to the correct zone for your geographic area to provide accurate readings.
Each zone compensates for the natural variation in the Earth’s magnetic field. Using the wrong zone setting can result in directional readings that are off by several degrees.
Programming Your Zone Setting
To set your declination zone, press and hold both the compass calibration button (usually located near the map lights) and the HomeLink button simultaneously until the display shows “CAL” followed by a zone number.
Press the compass button repeatedly to cycle through zone numbers 1 through 15. Find your zone using the map in your owner’s manual or by searching online for “magnetic declination zone” plus your zip code.
Once you’ve selected the correct zone number, wait five seconds without pressing any buttons. The display will show your current compass heading, confirming the zone is set.
Calibrating Compass Accuracy
After setting your zone, you’ll need to calibrate the compass by driving in a complete circle. Find a large, empty parking lot away from large metal structures, power lines, or other vehicles that might interfere with the magnetic field.
Press and hold the compass calibration button until “CAL” appears in the display. Drive slowly in a complete 360-degree circle at less than 5 mph. The display will show “CAL” during this process.
When calibration is complete, the display will show your current compass heading. If the calibration fails, the display will continue showing “CAL” and you’ll need to repeat the process in a different location.
Programming HomeLink Garage Door Buttons
Most Outback mirrors include three HomeLink buttons that can control garage doors, gates, or other remote-controlled devices. These buttons are located on the bottom of the mirror housing, typically labeled with small icons.
Clearing Previous Settings
Before programming new devices, clear any existing settings by pressing and holding the two outer HomeLink buttons simultaneously until the LED indicator turns orange (about 20 seconds). This erases all previous programming.
To clear just one button, press and hold that specific button until the LED turns orange, then release.
Programming Rolling Code Garage Doors
Most garage doors manufactured after 1996 use rolling code technology for security. Programming these requires a two-step process involving both your mirror and the garage door opener motor unit.
First, hold your garage door remote 1-3 inches from the HomeLink button you want to program. Press and hold both the HomeLink button and your garage door remote button simultaneously.
Keep holding until the HomeLink LED changes from orange to green (this takes 10-60 seconds depending on your remote). Release both buttons when the light turns green.
Next, you must activate the learning mode on your garage door opener motor unit. Most openers have a small colored “learn” button on the motor housing. Press and release this button, which typically causes an LED to turn on for about 30 seconds.
Within those 30 seconds, return to your vehicle and press the programmed HomeLink button three times, holding each press for about two seconds. The garage door should operate, confirming successful programming.
Programming Fixed Code Devices
Older garage doors and some gates use fixed code technology, which is simpler to program. Hold your remote 1-3 inches from the HomeLink button and press both buttons simultaneously.
The HomeLink LED will start as orange and turn green when programming is complete. This usually takes 10-60 seconds. Test the button to confirm it operates your garage door or gate.
Using the Map Light Controls
Your mirror includes small map light buttons that control the dome lights in your cabin. These buttons are separate from the HomeLink and compass controls, typically located on either side of the main mirror housing.
Press the left button to turn on the driver’s side map light, and the right button for the passenger side. Press either button again to turn the respective light off. Some models include a center button that controls both lights simultaneously.
The map lights operate independently of your vehicle’s main dome light settings. You can use them for reading maps, finding items, or providing ambient lighting without affecting the automatic dome light functions.
Troubleshooting Common Mirror Issues
If your auto-dimming feature stops working properly, check that the sensors aren’t blocked by debris or aftermarket accessories like radar detectors. Clean both the forward and rear-facing sensors with a soft cloth.
Compass readings that seem consistently incorrect usually indicate either wrong zone settings or the need for recalibration. Verify your zone setting matches your geographic location and recalibrate in a different area if problems persist.
HomeLink buttons that suddenly stop working often indicate interference from other electronic devices or changes to your garage door opener settings. Try reprogramming the affected button following the original setup process.
Erratic behavior from any mirror function might indicate loose wiring connections behind the mirror. This typically requires professional service, as accessing the mirror wiring involves removing headliner components.
Maintaining Your Mirror System
Keep your mirror clean using only glass cleaner and soft cloths. Avoid ammonia-based cleaners that can damage the electrochromic coating or plastic housing components.
The light sensors require periodic cleaning to function properly. Use a cotton swab slightly dampened with glass cleaner to gently clean the small sensor openings without pressing hard enough to damage the components.
Extreme temperature changes can temporarily affect electrochromic performance. The mirror might respond more slowly to lighting changes in very cold weather, which is normal behavior.
Frequently Asked Questions
Why doesn’t my mirror dim even in bright headlight glare?
The auto-dimming feature only activates when the forward sensor detects low ambient light conditions. If you’re driving during daylight or under bright street lighting, the system won’t engage even if there are bright lights behind you. Check that the manual override button hasn’t been pressed to disable the feature.
How often do I need to recalibrate the compass?
Compass calibration should remain accurate for months or years under normal conditions. Recalibrate only if readings become consistently inaccurate or if you’ve had major electrical work done on your vehicle. Moving to a different magnetic declination zone also requires setting a new zone number.
Can I program HomeLink to work with multiple garage doors?
Yes, each of the three HomeLink buttons can be programmed to control different devices. You can have one button for your home garage, another for your workplace, and a third for a gate or second garage door. Each button remembers its programming independently.
What should I do if the mirror display shows error messages?
Error displays usually indicate calibration problems or electronic malfunctions. Try recalibrating the compass first. If error messages persist or if the auto-dimming feature stops working entirely, have the system checked by a Subaru technician, as internal electronic components may need replacement.



Leave a Reply