Old wiper blades leave streaks, make noise, and can barely clear your windshield when you need them most. Replacing them isn’t complicated, but doing it the right way makes all the difference between blades that last and ones that fail after a few months.
Understanding Your Wiper Blade Attachment Type
Before you head to the auto parts store, you need to know what type of attachment your car uses. There are three main types you’ll encounter: hook, pin, and bayonet connections.
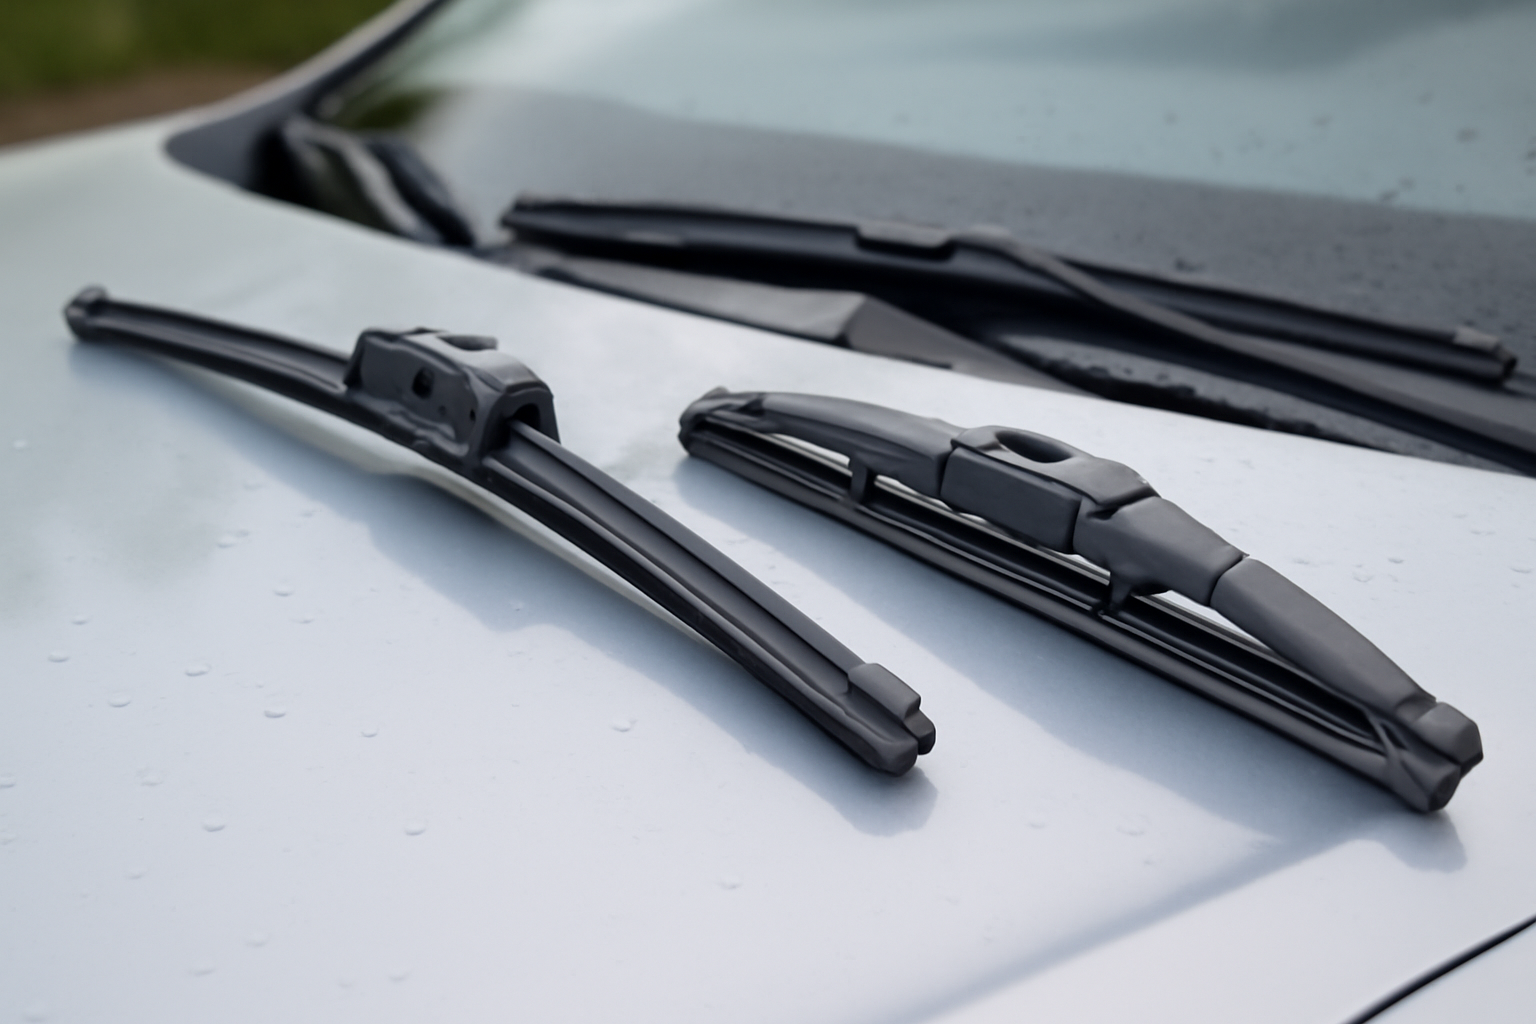
The hook style is the most common. It looks exactly like it sounds, with a curved hook that clips onto a matching arm on your wiper. You’ll find this on most vehicles made in the last 20 years.
Pin connections use a small pin that slides through a hole in the wiper arm. These are less common but still found on some European vehicles and older cars. Bayonet attachments twist and lock into place, similar to how you’d attach a garden hose nozzle.
Check your current blades before shopping. The attachment type should be clearly visible where the blade connects to the arm. When in doubt, take a photo with your phone to show the parts counter staff.
Choosing Between Beam, Conventional, and Hybrid Blades
Conventional wiper blades have a metal frame with multiple pressure points. They’re the traditional style you’ve probably seen for decades. These work fine for most vehicles and cost less than other options.
Beam blades have a solid rubber construction without the metal framework. They create more even pressure across the entire blade length and handle curved windshields better. They also resist ice buildup in winter conditions.
Hybrid blades combine both designs, using a low-profile frame with beam blade technology. They offer better performance than conventional blades while maintaining the familiar frame structure.
For most drivers, beam blades provide the best combination of performance and durability. They cost more upfront but typically last longer and clear better in various weather conditions.
Tools and Preparation
You don’t need many tools for this job, but preparation prevents problems. Grab a clean towel and lay it across your windshield before you start. This protects the glass if the wiper arm snaps back during replacement.
Park in shade if possible. Hot windshields make the rubber more pliable and harder to handle. You’ll also want good lighting to see the attachment mechanism clearly.
Lift both wiper arms away from the windshield before removing either blade. This gives you better access and prevents the arms from falling back onto the glass.
Step-by-Step Replacement Process
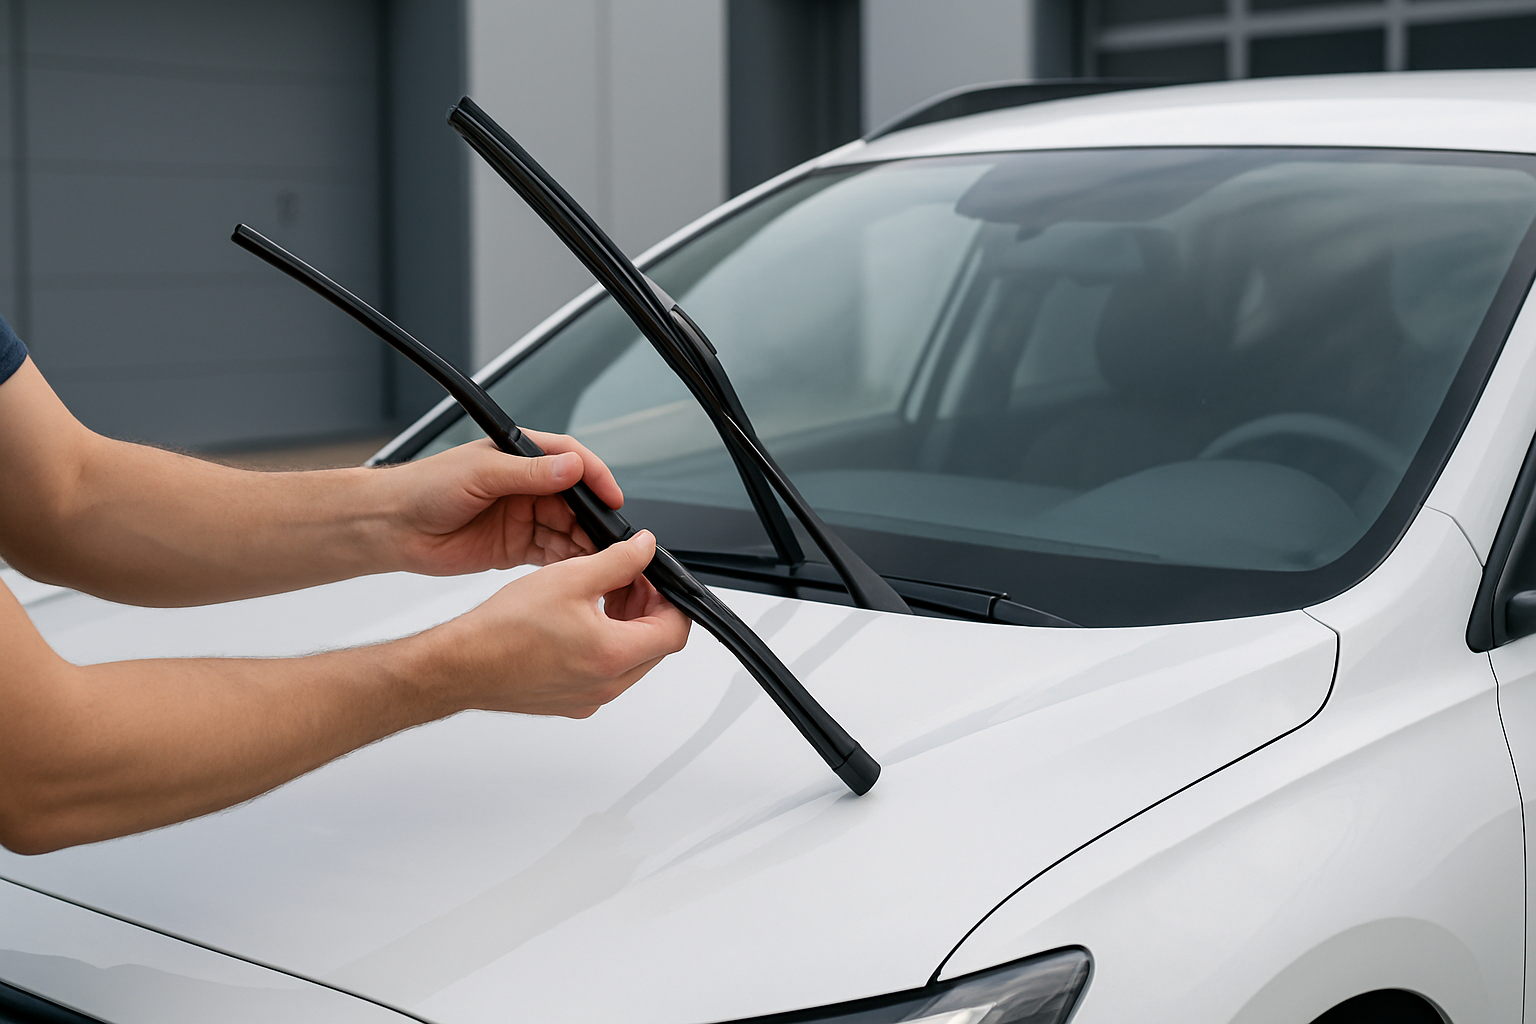
Start with the driver’s side blade since it typically gets more wear. With the arm lifted and the towel protecting your windshield, locate the attachment point where the blade meets the arm.
For hook attachments, look for a small tab or lever near the connection. Press this tab while pulling the blade away from the hook. The blade should slide off easily once you find the release mechanism.
Pin-type connections require you to lift a small cover or press a release button, then slide the blade off the pin. Bayonet styles need a quarter-turn counterclockwise before they’ll pull free.
Before installing the new blade, compare it to the old one. They should be the exact same length and have the same attachment type. The packaging should also confirm compatibility with your vehicle.
Installation reverses the removal process. For hook types, slide the new blade onto the hook until you hear it click into place. Give it a gentle tug to make sure it’s secure.
Pin attachments slide onto the pin until the release mechanism clicks. Bayonet types require pushing the blade onto the connection and turning clockwise until it locks.
Repeat the process for the passenger side blade. Many vehicles use different lengths for driver and passenger sides, so don’t assume they’re interchangeable.
Quality Blade Recommendations
When shopping for replacement blades, quality matters more than price. Cheap blades might save money initially but often need replacement within a few months. Premium beam wiper blades typically offer the best combination of performance and longevity for most vehicles.
Bosch, Rain-X, and Michelin all make reliable beam blades that fit most vehicles. These brands engineer their blades for consistent pressure distribution and weather resistance. The investment pays off in clearer visibility and longer replacement intervals.
Avoid universal or “fits all” blades unless you’ve confirmed they work with your specific attachment type. Vehicle-specific blades ensure proper fit and optimal performance.
Testing and Fine-Tuning
After installation, lower the wiper arms gently back to the windshield. Don’t let them snap down, which could damage the new blades or your windshield.
Turn on your wipers and test them at different speeds. They should move smoothly without chattering, skipping, or making noise. If you notice problems, check that the blades are properly seated in their attachments.
Test with windshield washer fluid to see how well they clear liquid. New blades might seem stiff initially but should conform to your windshield shape after a few cycles.
If the blades chatter or skip, they might not be making full contact with the windshield. This usually indicates an attachment problem or occasionally a bent wiper arm.
Maintenance and Replacement Schedule
Plan to replace your wiper blades every 6 to 12 months, depending on your climate and usage. Hot, sunny climates break down rubber faster, while areas with frequent ice and snow create more wear.
Clean your blades monthly with a damp cloth to remove built-up dirt and debris. This simple maintenance extends blade life and improves performance. Avoid using harsh cleaners or petroleum-based products that can damage the rubber.
Replace blades immediately if you notice streaking, skipping, or torn rubber. Damaged blades can scratch your windshield, creating expensive repair bills.
Keep spare blades in your garage or trunk, especially during winter months. Being able to replace a failing blade quickly beats driving with poor visibility.
Common Installation Mistakes
The biggest mistake is forcing the connection when the blade doesn’t want to attach. Each attachment type has a specific installation method, and force usually means you’re doing something wrong.
Installing the wrong size blade creates poor performance and potential damage. Double-check the length measurements and vehicle compatibility before installation.
Forgetting to protect the windshield during installation risks expensive glass damage. Always use that towel, even for quick replacements.
Not testing the blades immediately after installation can leave you with poor visibility when you need clear sight most. Take two minutes to run them through a complete cycle.
Frequently Asked Questions
Can I replace just one wiper blade?
You can replace individual blades, but it’s better to replace both at the same time. Mismatched blade ages create uneven cleaning performance and different replacement schedules.
Why do my new blades still streak?
New blades sometimes need a few cycles to break in properly. If streaking persists, clean your windshield thoroughly with glass cleaner. Built-up wax or residue prevents proper blade contact.
How do I know what size blades my car needs?
Check your owner’s manual for the exact sizes, or measure your current blades from end to end. Most auto parts stores also have lookup tools that match blade sizes to your vehicle’s year, make, and model.
Can I install beam blades on a car that came with conventional ones?
Yes, as long as the attachment types match. Beam blades often improve performance over conventional ones, especially on curved windshields.
This article contains affiliate links. If you purchase through these links, we may earn a small commission at no extra cost to you.

Leave a Reply