Breathing stale, dusty air while driving isn’t just uncomfortable, it’s unnecessary. Your cabin air filter keeps the air inside your car clean, but dealers often charge $60-80 to replace a filter that costs $15 and takes just minutes to swap out yourself.
What Your Cabin Air Filter Actually Does
Your cabin air filter sits between the outside world and your car’s interior, trapping dust, pollen, exhaust fumes, and other airborne particles before they reach you. Every time you turn on your heat, AC, or even just the fan, air passes through this filter.
Most cabin air filters hide behind your glove box, making them invisible until they’re clogged. A dirty filter restricts airflow, making your climate control system work harder and blow weaker. You’ll notice reduced air flow from your vents, fogged windows that won’t clear, and sometimes even musty odors.
Car manufacturers typically recommend replacing cabin air filters every 15,000-20,000 miles, but if you drive in dusty conditions or heavy traffic, you might need to change it more frequently.
Why Dealers Overcharge for This Simple Job
Dealerships treat cabin air filter replacement like any other service appointment. They’ll quote you 30 minutes of labor at $100+ per hour, plus markup on the filter itself. The entire job actually takes about 5 minutes once you know what you’re doing.
The filter itself costs $10-25 depending on whether you choose a basic paper filter or an upgraded charcoal version. Dealers often use this as an upsell during oil changes because most drivers don’t realize how easy the replacement process is.
What You’ll Need for the Job
The beauty of this repair is that you probably don’t need any tools. Most cabin air filters are designed for tool-free removal, though some vehicles might require a screwdriver to remove a panel.
You’ll obviously need a new filter. Check your owner’s manual for the exact part number, or look up your vehicle’s year, make, and model at any auto parts store website. Activated charcoal cabin air filters cost slightly more than basic paper filters but do a better job filtering odors and fumes.
Popular filter brands include Fram, K&N, Mann, and Bosch. The K&N filters are washable and reusable, while charcoal-activated versions from Mann or Bosch provide superior odor control.
Step-by-Step Replacement Process
Start by parking on level ground and turning off your engine. You’ll be working inside the passenger compartment, specifically around the glove box area.
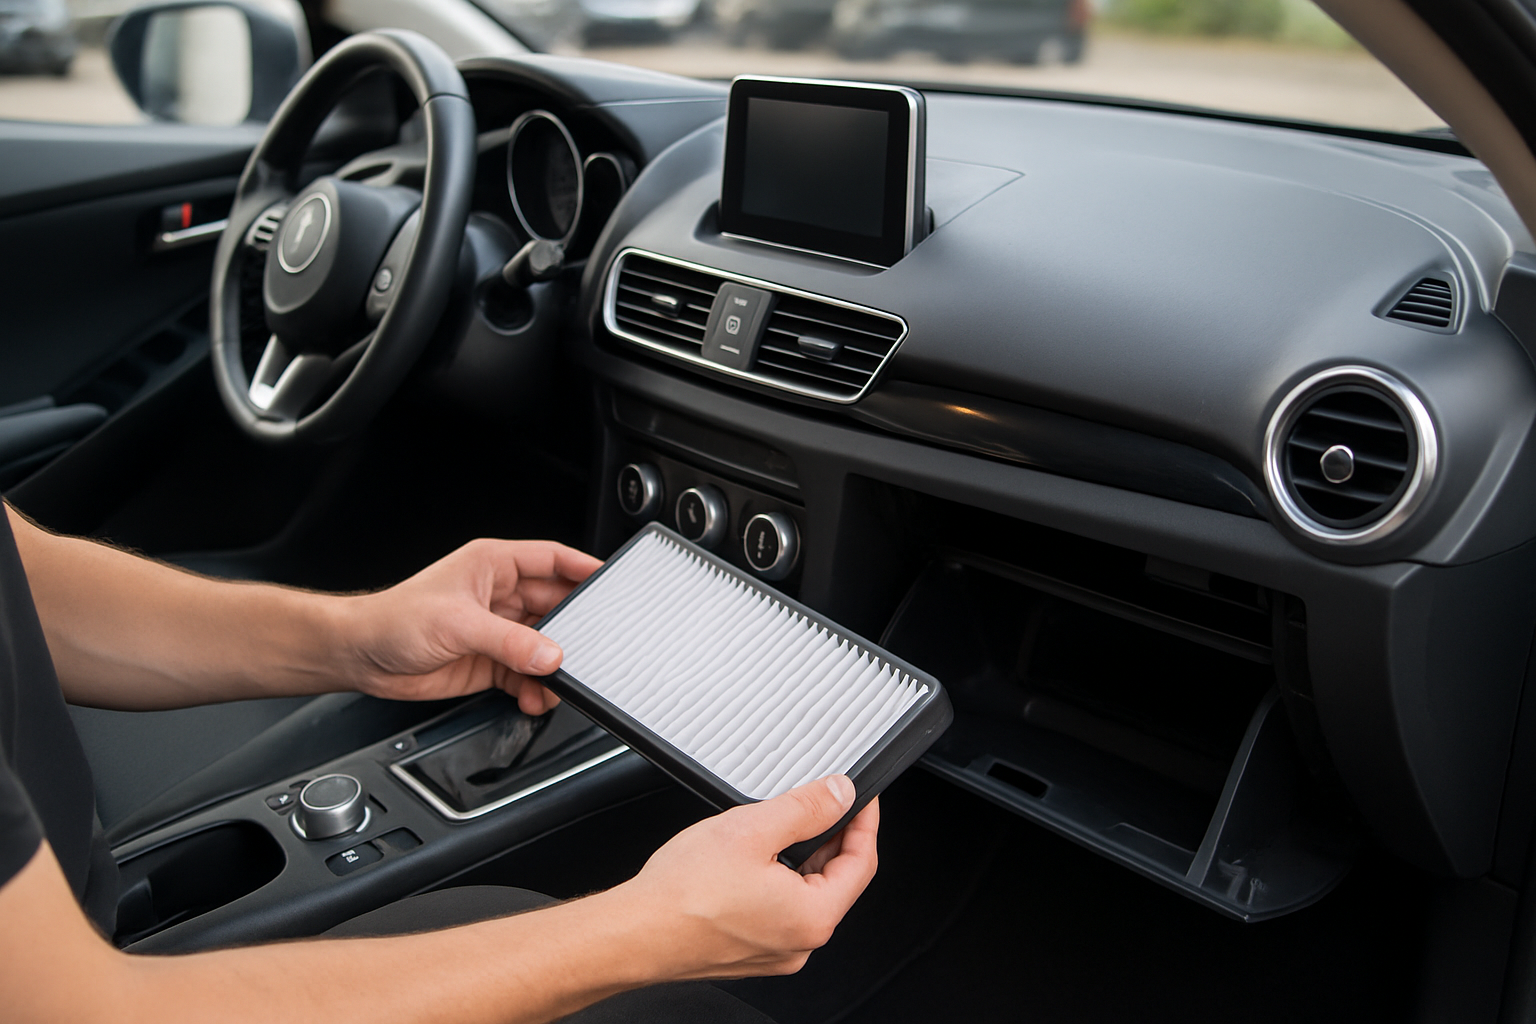
Step 1: Empty and Remove the Glove Box
Take everything out of your glove box first. Open the glove box door completely and look for plastic stoppers or dampers on the sides that prevent it from opening too far.
Gently squeeze the sides of the glove box inward while pulling it down. The stoppers should pop free, allowing the glove box to hang down and reveal the cabin air filter housing behind it. Some vehicles have a damper strap that you’ll need to unhook.
Step 2: Locate the Filter Housing
With the glove box out of the way, you should see a rectangular plastic housing directly behind where the glove box was mounted. This housing will have tabs, clips, or a removable cover.
The filter housing usually sits horizontally and may have arrows indicating airflow direction. Take a photo with your phone before proceeding, so you’ll remember how everything goes back together.
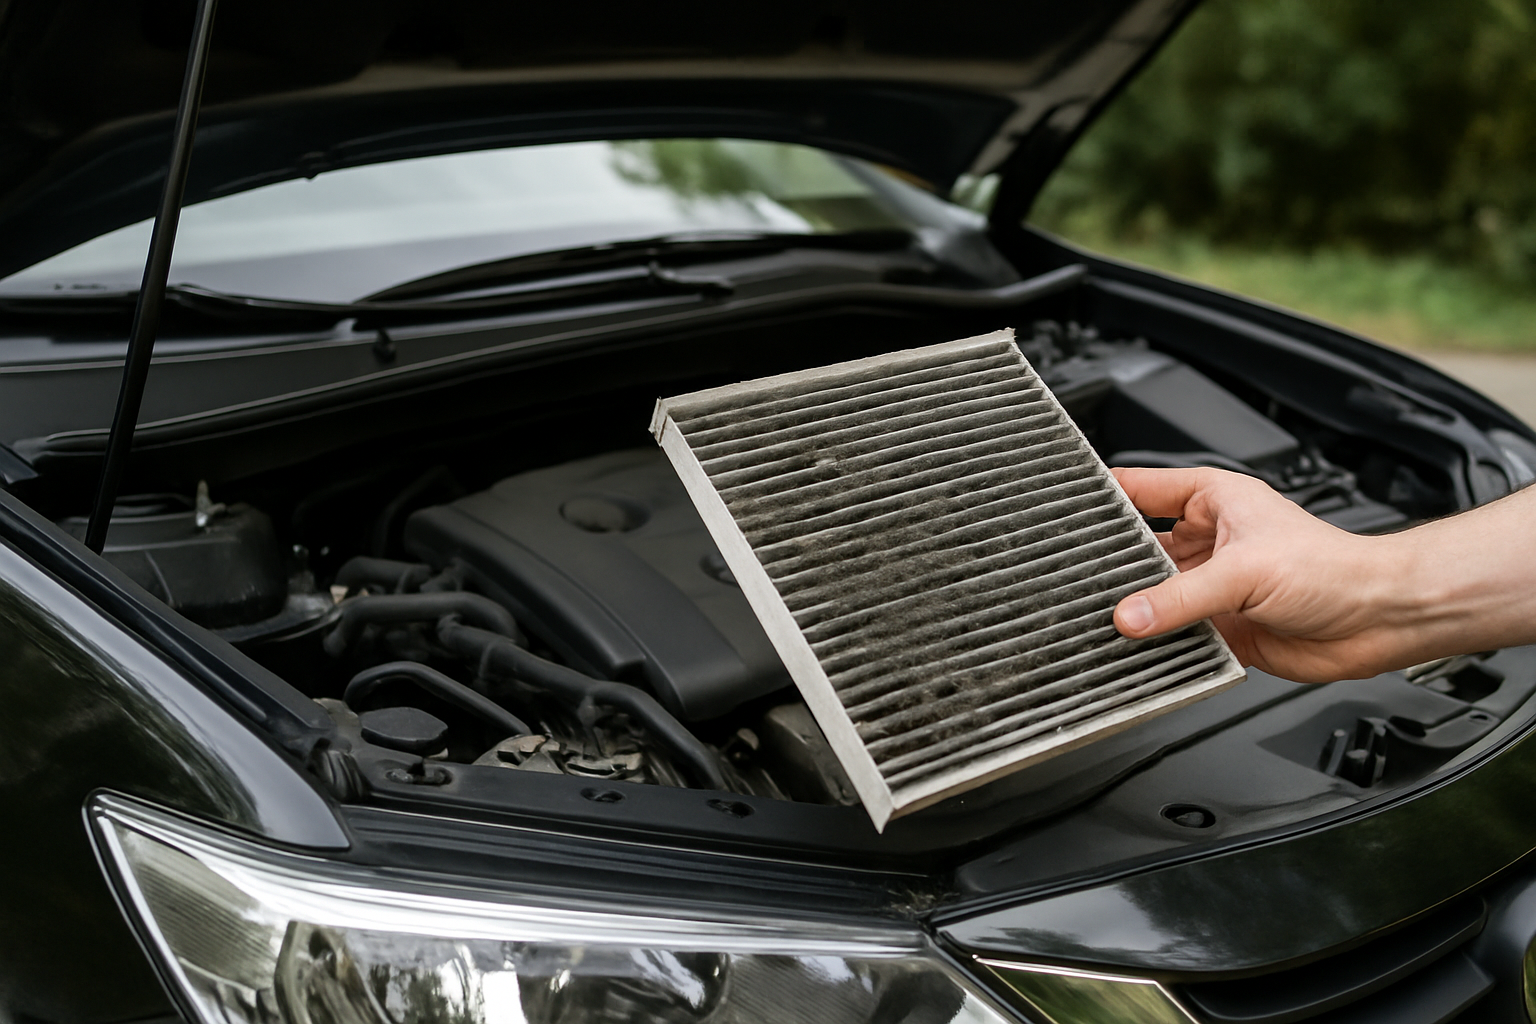
Step 3: Remove the Old Filter
Open the housing by pressing the tabs or removing the cover. The old filter should slide straight out, though it might be snug if it’s been in there for a while.
Don’t be surprised if the old filter looks disgusting. A filter that’s done its job will be gray or black with accumulated debris. This is exactly what would have been circulating through your car’s interior without the filter.
Step 4: Install the New Filter
Before installing the new filter, check for airflow direction arrows printed on the filter frame. These arrows should point toward the passenger compartment, which means toward where the glove box normally sits.
Slide the new filter into the housing exactly like the old one came out. Make sure it sits flush and completely fills the opening. A partially installed filter will allow unfiltered air to bypass the system.
Step 5: Reassemble Everything
Close the filter housing and make sure all tabs or clips are properly secured. Reinstall the glove box by reversing the removal process, reconnecting any damper straps and making sure the side stoppers click back into place.
Test your work by turning on the car and running the climate control system. You should notice improved airflow immediately if your old filter was clogged.
Choosing the Right Replacement Filter
Basic paper filters do an adequate job of catching dust and larger particles, but activated charcoal filters provide superior performance. The charcoal layer absorbs odors, exhaust fumes, and chemical vapors that paper alone can’t handle.
If you live in an area with heavy traffic, industrial activity, or frequent wildfires, the upgrade to charcoal is worth the extra $5-10. Urban drivers will particularly notice the difference in air quality during stop-and-go traffic.
Washable filters like those from K&N offer long-term value if you’re willing to clean them regularly. These reusable filters cost more upfront but can last 50,000+ miles with proper maintenance.
When to Check Your Filter
Even if you’re not ready to replace the filter yet, checking it periodically helps you stay ahead of problems. A visual inspection takes just a few minutes and can save you from breathing increasingly polluted air.
Check your cabin air filter every 15,000 miles or once a year, whichever comes first. If you drive in dusty conditions, during wildfire season, or in heavy urban traffic, inspect it every 10,000 miles.
You’ll know it’s time for replacement when the filter looks dark gray or black, feels clogged with debris, or starts to smell musty. Don’t wait until your climate control performance suffers.
Troubleshooting Common Issues
If your glove box won’t come down far enough, double-check that you’ve disengaged all the stops and dampers. Some vehicles have multiple connection points that need to be released.
Can’t find the filter housing? Some vehicles mount it vertically or in slightly different locations. Consult your owner’s manual or search online for your specific year and model if the housing isn’t immediately obvious.
If the new filter doesn’t seem to fit properly, verify you have the correct part number. Cabin air filters are specific to each vehicle model and year, and even slight size differences will prevent proper installation.
Why This Beats Paying the Dealer
Once you’ve replaced your cabin air filter yourself, you’ll wonder why anyone pays dealer prices for this service. The job takes less time than waiting in the service department lobby, and you’ll save $40-60 every time you do it.
You can also upgrade to a better filter than what the dealer typically installs. Most dealers use basic paper filters, but you can choose charcoal-activated or washable options that provide superior performance.
Doing the work yourself also means you can inspect and replace the filter on your schedule, rather than waiting until your next service appointment when the dealer remembers to check it.
Frequently Asked Questions
How often should I really replace my cabin air filter?
Every 15,000-20,000 miles under normal driving conditions, but check it annually regardless of mileage. If you drive in dusty areas, heavy traffic, or during wildfire season, inspect it every 10,000 miles. Trust your nose too – if you smell musty odors when running the climate control, it’s probably time for a new filter.
Will using a different brand filter cause any problems?
Any quality filter with the correct dimensions will work fine. Stick to reputable brands like Fram, Bosch, Mann, or K&N, and make sure the part number matches your vehicle. The filter housing and airflow design matter more than the specific brand name.
Can I clean my old filter instead of replacing it?
Paper filters are designed for single use and shouldn’t be cleaned. Washing them damages the filter media and reduces effectiveness. Only washable filters like K&N are designed for cleaning and reuse. When in doubt, replacement is always the safer choice.
What happens if I don’t replace a clogged cabin air filter?
Your climate control system will work harder and blow weaker air, windows will fog up more easily, and you’ll breathe increasingly polluted air. Eventually, a severely clogged filter can damage your blower motor from overwork. The $15 filter replacement is much cheaper than a $300 blower motor repair.
This article contains affiliate links. If you purchase through these links, we may earn a small commission at no extra cost to you.

Leave a Reply