
If your Dodge Journey’s battery is out of juice, a jump start may be the only way to get it up and running. However, if you’ve got no experience of jump-starting a car battery, you may not know how to start. This process isn’t too tricky, but needs to be carried out with care and precision to avoid any mistakes or risks. This guide will cover exactly how to jump a Dodge Journey, step by step. We’ll also cover what to do when your Journey is up and running again.
How to Jump Start a Journey: Step 1 – Preparation
First, before popping the hood or hooking up the cables, there are a few preparatory steps to follow. Prep really matters when it comes to jump-starting a Dodge Journey (or any other car) as it reduces the risk of any accidents or unwanted side effects from the process.
First, you’ll need to make sure you’ve got a good quality set of jumper cables to use. You’ll also need a secondary vehicle (a “donor” vehicle) with a fully-functional battery. Alternatively, you can use a portable battery booster to jump your Journey if another vehicle isn’t available. Safety gloves and glasses are also recommended.
Make sure the parking brake is engaged and shift your car into “Park,” with the ignition on “Lock.” Additionally, switch off all electrical systems, like the heater, the radio, and any in-car entertainment screens or GPS devices.
You’ll also want to make sure that, if you’re using a secondary vehicle to jump your Journey, it’s parked close by. Ideally, the two vehicles should be parked facing one another, so you can easily pop the hoods on both and connect the cables without running out of room.
Step 2. Pop the Hood
Find the hood release lever, which is typically below and to the left of the steering wheel, and pull it. Then step out of the vehicle, release the safety catch, and lift the hood. Use the hood prop to hold the hood in place while you work. Do the same for the secondary vehicle.
Step 3. Locate the Terminals
Next, you’ll want to locate the car battery and the positive (+) and negative (-) terminals, where you’ll be connecting the jumper cables. Make sure to put on your safety glasses and gloves before this stage, if you have them.
The positive terminal is red and marked by a + sign. Find it and remove its cover. If you have any trouble with this, look for the little locking tab. Push on that, then pull the cover upward, and it should come away freely.
You’ll also need a negative ground. For this, you can use any unpainted metal surface around the engine. Find a spot that is easy to access and keep it in mind when attaching the negative cables in the next step.
This is also a good time to inspect the batteries in both vehicles. Look for any signs of damage, such as cracks, acid leaks, corrosion, or even swelling of the battery itself. If the battery looks damaged or is leaking, it’s best to avoid attempting a jump start and call a mechanic instead.
Step 4. Connect the Cables
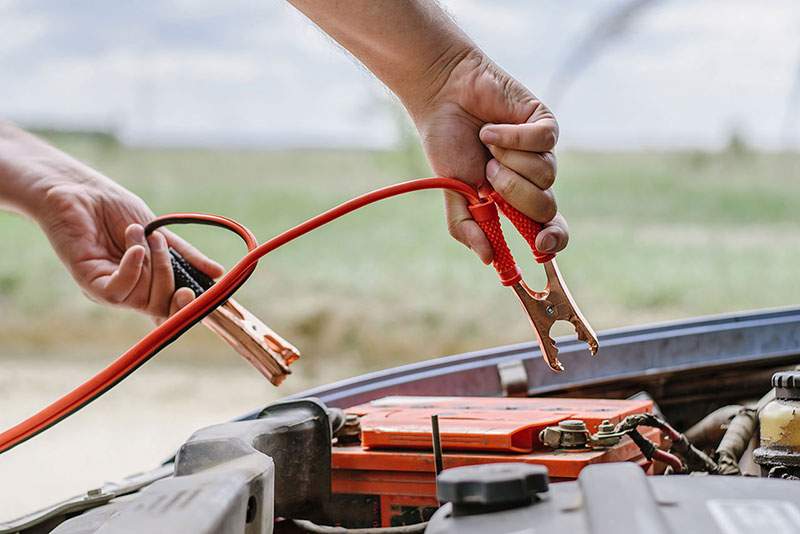
This is the most important step, and arguably the trickiest, too. You’ll need to hook up the jumper cables to the two car batteries, and there’s a very precise order to follow. If you do anything out of order or connect to the wrong locations, you could endanger yourself or damage the vehicles.
To begin, take the red (positive) jumper cable and connect one of the clamps to the positive terminal on the Dodge Journey. After that, connect the other end to the positive terminal on your secondary vehicle.
Take the black (negative) cable and connect one clamp to the negative terminal on the secondary vehicle, or your portable booster. Continue by attaching the other end to your negative ground (an unpainted metal section) on the Journey.
Step 5. Turn On the Secondary Vehicle
Turn on the engine of the secondary vehicle. Let it run for a few minutes to transfer energy from the donor battery to the dead Dodge Journey battery. You can also rev the engine in the secondary vehicle to help speed up the process.
After a few minutes, try starting the Dodge Journey. If it starts, disconnect the cables in the following order:
- The negative ground from the Dodge Journey.
- The negative cable from the donor vehicle.
- The positive clamp on the donor vehicle.
- The positive clamp from the Dodge Journey.
If the Dodge Journey still won’t turn over, leave it for another few minutes and try again. It may just need some more time. If it still won’t start, even after several attempts, there may be an underlying issue with either the battery or the alternator, and you might have to call a mechanic to fix it.
Step 6. Drive the Dodge Journey
Once your Dodge Journey fires up, it’s important to drive it around for a little while. This helps to recharge the battery. Aim to drive for at least 10 minutes, if not longer. The longer you can keep your car running, the more the battery will charge. Also, try to avoid using any electrical systems during this time, like the radio, as this will put extra stress on the battery and use power unnecessarily.
You may now want to visit a dealership or local garage to get your Dodge Journey looked at. Expert technicians can diagnose unexplained battery issues. However, you might already be able to figure out what went wrong on your own. For example, if you left the headlights on for a while, that’s most likely why the battery drained and needed to be jumped.
FAQs
Why do you need a jump-start?
There are multiple potential reasons why a car might need a jump-start, including a dying battery, issues with the charging system, or a faulty alternator. In many cases, it’s because the car hasn’t been driven in a long time, causing the battery to gradually lose charge.
Jump Your Journey in a Few Easy Steps
As you can see, jumping a Dodge Journey is pretty similar to jumping any other car. It’s a relatively simple process, once you know how, but it still requires caution. Make sure to wear the proper safety equipment, take your time, and follow the correct clamping order to avoid any problems along the way.
Leave a Reply