
If you’re driving a Ford Escape for the first time and notice that your clock is off, you might not know how to change it. Setting the clock in your Ford Escape is required after every battery change and (for some models) if you travel to a different time zone. Using the image which suits your vehicle, here are the uncomplicated steps to follow to set the time on the clock.
2020 – 2023 Models
IMAGE 1
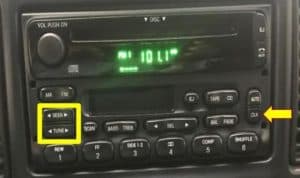
- With your vehicle in the ON position without starting the engine.
- Located on the Right-side of the console, press and HOLD the CLK button, then press the RIGHT side of the SEEK button to go UP in HOURS and the LEFT side to go DOWN in HOURS.
- Continue HOLDING the CLK button, then press the RIGHT side of the TUNE button to go UP in MINUTES and the LEFT side to go DOWN in MINUTES.
- Release the CLK button to display your chosen time.
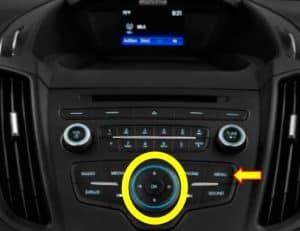
IMAGE 2
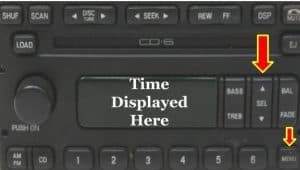
- With your vehicle in the ON position without starting the engine.
- Press the MENU button until the screen shows SELECT HOUR.
- Use the UP and DOWN arrow buttons to change the hour.
- Press the MENU button again, once, you will see SELECT MINS.
- Use the UP and DOWN arrow buttons to change the minutes.
- Press the MENU button to set your chosen time.
IMAGE 3
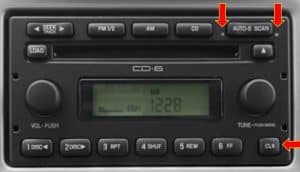
- With your vehicle in the ON position without starting the engine.
- Press the CLK button to access the clock.
- Press the AUTO-S SCAN button on the LEFT for (H) HOURS and the RIGHT for (M) MINUTES.
- Press CLK to set your chosen time.
IMAGE 4
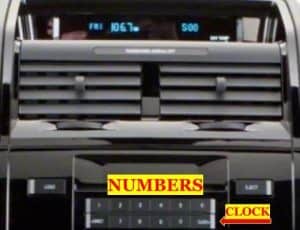
- With your vehicle in the ON position without starting the engine.
- Press the CLOCK button, the screen will read SET TIME
- Use the NUMBER keys to set your desired time.
IMAGE 5- For Models with a Navigation Screen:
- With your vehicle in the ON position without starting the engine.
- Press the MENU button.
- Use the DOWN arrow to scroll down to CLOCK SETTINGS.
- Press the center OK button.
- When SET TIME is highlighted, use the ARROWS to set your desired time.
2013 – 2019 Models
- Turn on the ignition to the“ACC” position, but do not start the engine.
- Press the “Clock” button in the lower right-hand corner of the display screen.
- Press and hold the “Clock” button until the hours start flashing.
- Use the “+” and “-” buttons to set the correct hour.
- Press the “Clock” button until the minutes start flashing.
- Use the “+” and “-” buttons to set the correct minutes.
- Press the “Clock” button to exit the clock setting mode.
2001 – 2012 Models
- Turn on the ignition to the “ACC” position, but do not start the engine.
- Press and hold the “CLK” button, then use the “SEEK” button to set the hours.
- Use the “TUNE” button to set the minutes.
- Release the “CLK” button when the clock is set to the correct time.
TIP: Turning on the GPS TIME will allow the system to automatically adjust your time dependent on your present location. This feature will change your clock when you cross into a different time zone.
If you are unable to set the Time on the first try, REPEAT the steps. If you are still unsuccessful, contact the dealership for assistance or consult your vehicle user’s manual.

Leave a Reply