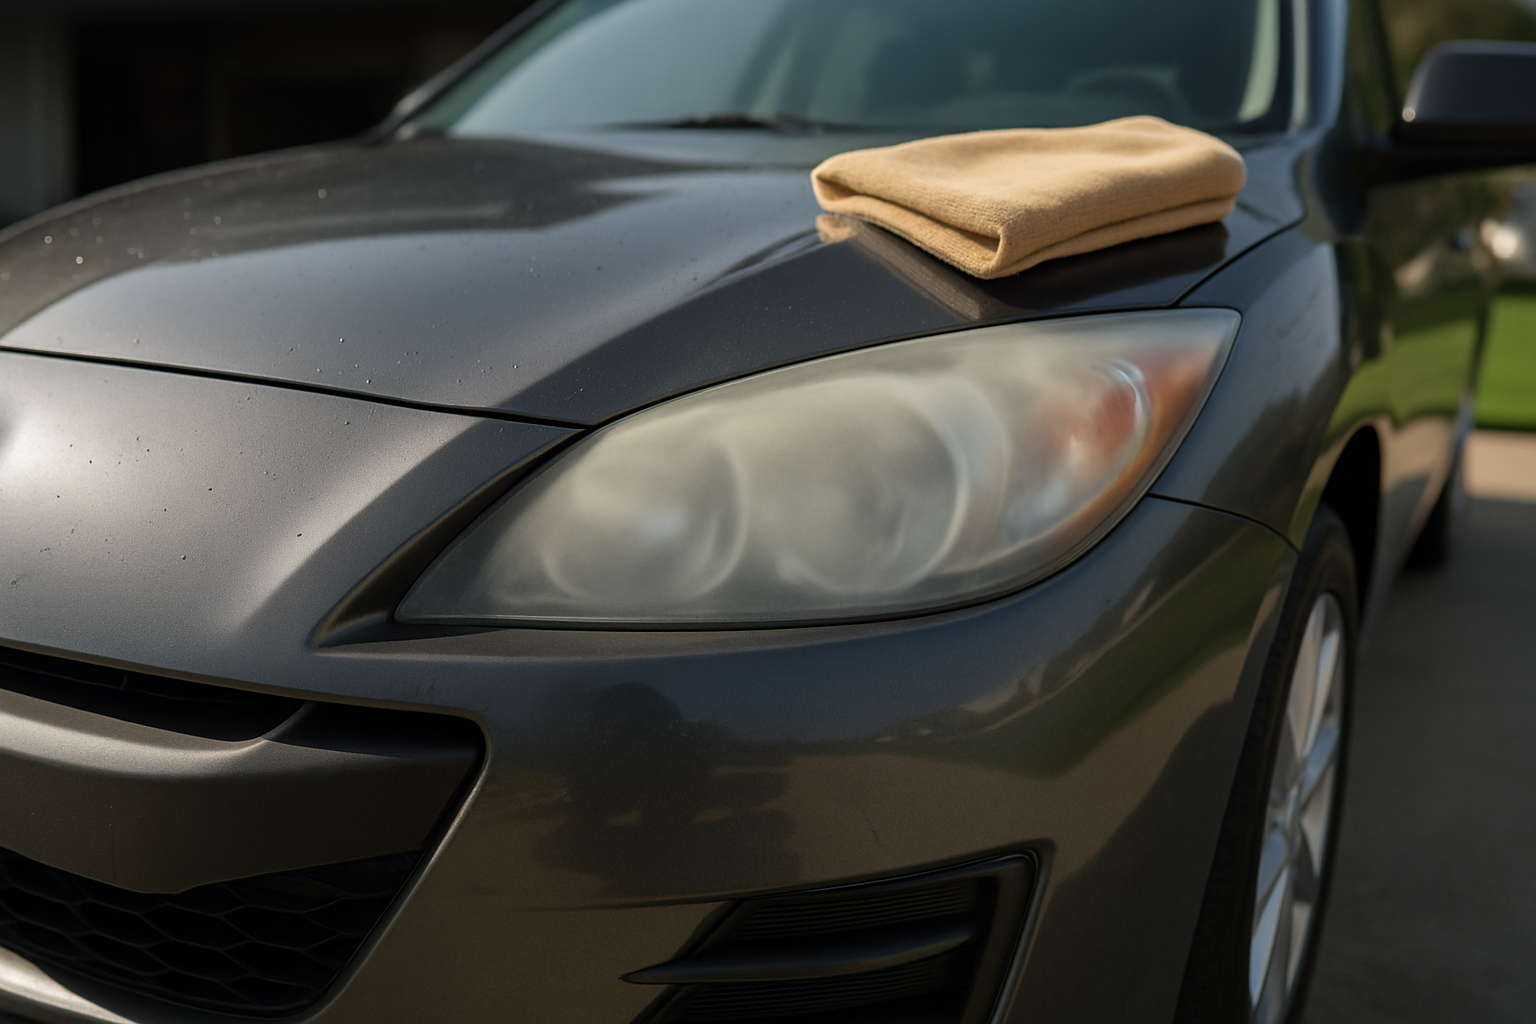
Foggy, yellowed headlights don’t just make your car look tired and old. They’re a serious safety hazard that can reduce your headlight output by up to 40%, making nighttime driving dangerous for you and other drivers.
The good news is that you can restore your headlights to like-new clarity for about $15 and an hour of your time. Here’s everything you need to know about why headlights get foggy and how to fix them permanently.
Why Headlights Get Foggy in the First Place
Modern headlight lenses are made from polycarbonate plastic instead of glass. While polycarbonate is lighter and more impact-resistant than glass, it has one major weakness: UV radiation from the sun breaks down the plastic over time.
This UV degradation happens gradually. The outer layer of the polycarbonate becomes cloudy and yellowed as the plastic molecules deteriorate. Road debris, chemicals, and weather exposure speed up this process.
Most headlights start showing signs of fogging after 5-7 years, but cars parked outside in sunny climates can develop the problem much sooner. Once the degradation starts, it gets progressively worse until your headlights look like frosted glass.
The Real Safety Issue You’re Facing
Foggy headlights aren’t just cosmetic. The cloudy plastic acts like a filter, blocking significant amounts of light from reaching the road. Studies show that severely degraded headlights can reduce light output by 40% or more.
This reduction happens gradually, so you might not notice how bad your night vision has become. But other drivers definitely notice your dimmed headlights, which makes it harder for them to see your vehicle approaching.
During state inspections, severely fogged headlights can cause your vehicle to fail safety requirements. Rather than replacing entire headlight assemblies for $200-500 each, restoration costs a fraction of that amount.
What You’ll Need for DIY Restoration
You can restore your headlights using items from any auto parts store or online retailer. The wet sanding method works best for severely fogged lenses and provides professional-quality results.
Here’s what you’ll need:
- Sandpaper in 400, 600, 1000, and 2000 grits
- Polishing compound or headlight restoration kit
- Microfiber cloths
- Masking tape
- Spray bottle with water
- UV-resistant clear coat or ceramic coating
A complete headlight restoration kit from brands like Meguiar’s, Chemical Guys, or Turtle Wax typically costs $12-18 and includes most of these supplies. These kits save you from buying individual items and include detailed instructions.
Step-by-Step Restoration Process
Preparation
Park your vehicle in shade and let the headlights cool completely. Hot plastic can be damaged during sanding. Clean the headlight surface with soap and water to remove dirt and grime.
Use masking tape to protect the paint and trim around each headlight. Take your time with this step because sandpaper will scratch anything it touches.
Wet Sanding Progression
Start with 400-grit sandpaper for heavily oxidized lenses. Keep the surface wet at all times and use light, overlapping strokes in one direction. Don’t press hard or sand in circles.
After covering the entire lens with 400-grit, switch to 600-grit and sand in the opposite direction. This removes the scratches from the coarser paper. The lens will look worse before it gets better, which is completely normal.
Continue with 1000-grit, then 2000-grit, changing directions each time. By the 2000-grit stage, the lens should look clearer but still hazy from fine scratches.
Polishing and Protection
Apply polishing compound with a microfiber cloth using circular motions. Work in small sections and remove all haze from the sanding process. This step brings back the clear transparency.
Clean the lens thoroughly and apply your UV-resistant coating immediately. This protection layer prevents future oxidation and keeps your restoration looking good for years.
Why Ceramic Coating Is Worth the Extra Cost
Standard headlight restoration kits often include basic UV-resistant coatings that last 1-2 years. Ceramic coatings designed for headlights cost more upfront but provide 3-5 years of protection.
Ceramic coatings create a harder, more durable surface that resists UV damage, chemicals, and minor impacts. They’re particularly valuable if you park outside regularly or live in areas with intense sunlight.
Popular ceramic coating brands for headlights include Chemical Guys HydroSlick, Meguiar’s Endurance, and CarPro Dlux. These products typically add $10-15 to your restoration cost but extend the life of your work significantly.
Professional vs. DIY Results
Professional headlight restoration services charge $75-150 per vehicle and use similar techniques to what you can do at home. The main advantages of professional service are speed and experience with the process.
DIY restoration takes more time but costs much less and gives you control over the quality. Many car enthusiasts prefer doing the work themselves because they can take extra time on problem areas.
The results from either approach should be nearly identical when done correctly. Your headlights should look clear and new, with full light output restored.
Common Mistakes to Avoid
Don’t skip the wet sanding steps, even if your headlights seem only lightly fogged. Polishing compound alone won’t remove the damaged plastic layer that causes the cloudiness.
Avoid working in direct sunlight or on hot surfaces. Heat makes the plastic more prone to damage and causes compounds to dry too quickly for proper application.
Don’t rush the sanding progression. Each grit removes the scratches from the previous grit, and skipping steps leaves permanent marks that show through the final finish.
Always apply UV protection immediately after polishing. Exposed polycarbonate will start degrading again within days if left unprotected.
When Replacement Makes More Sense
Some headlights are too damaged for restoration to work effectively. Deep cracks, internal fogging, or severely pitted surfaces may require replacement instead of restoration.
If your headlights have internal moisture or condensation, the housing seals have failed. Restoration won’t fix this problem, and you’ll need new assemblies or professional seal repair.
Headlights with deep gouges or stone chips that go through multiple layers of plastic may not restore to acceptable clarity. In these cases, replacement assemblies from aftermarket suppliers often cost less than OEM parts.
Maintenance After Restoration
Keep your restored headlights clean with regular washing. Road salt, bug splatter, and tree sap can damage the protective coating if left on too long.
Inspect the UV coating every six months for signs of wear. Early reapplication of protective coating prevents the need for complete restoration again.
Consider applying car wax over the ceramic coating every few months. This adds another layer of protection and makes cleaning easier.
Frequently Asked Questions
How long does DIY headlight restoration take?
Plan on 45-60 minutes per headlight if you’re working carefully. Rushing the process leads to poor results, so give yourself plenty of time for each step. The wet sanding stages take the most time, but proper technique here determines the final quality.
Can I restore headlights multiple times?
Yes, you can restore the same headlights several times as long as there’s enough plastic thickness remaining. Each restoration removes a thin layer of material, so heavily restored lenses may eventually become too thin. Most headlights can handle 3-4 restoration cycles over their lifetime.
Will restoration affect my vehicle’s warranty?
Headlight restoration is considered normal maintenance and won’t void your vehicle warranty. You’re not modifying any mechanical or electrical components, just restoring the plastic lens to original condition. Keep receipts for the materials you use in case questions arise later.
What if my headlights fog up again quickly?
Rapid re-fogging usually means the UV protective coating wasn’t applied properly or has failed. Clean the headlights thoroughly and reapply a high-quality ceramic coating designed for automotive plastics. Make sure the surface is completely clean and dry before applying any protective products.
This article contains affiliate links. If you purchase through these links, we may earn a small commission at no extra cost to you.
Leave a Reply