
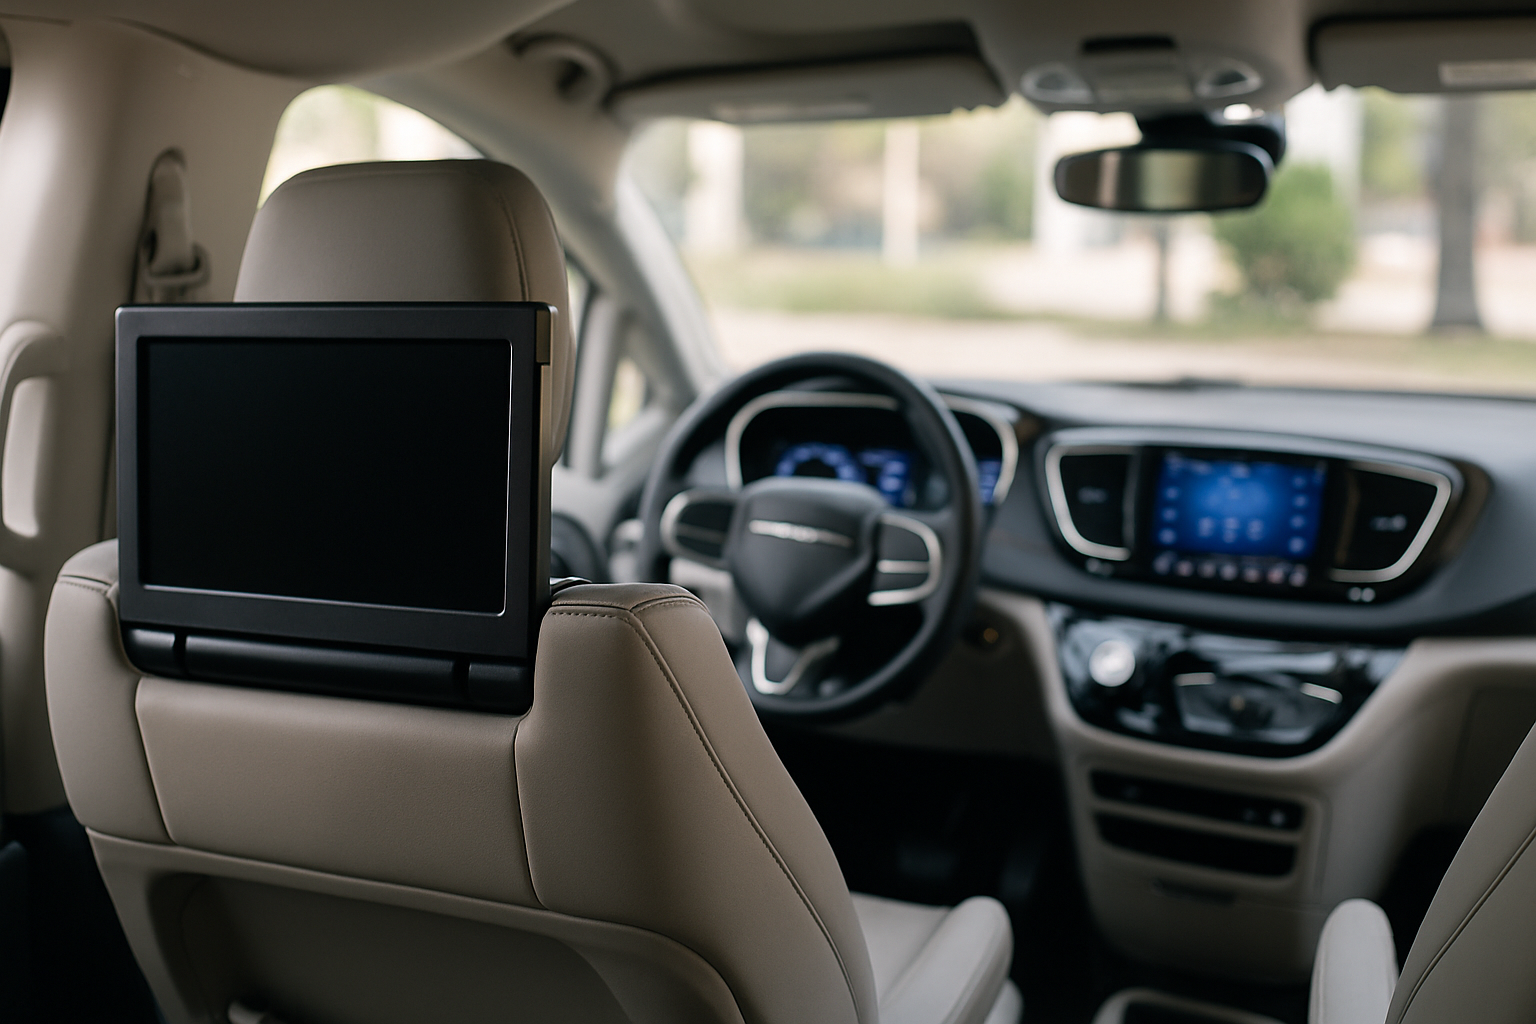
Long road trips with kids can be challenging, but the Chrysler Pacifica’s rear seat entertainment system makes those journeys much more manageable. The Uconnect Theater system transforms your family hauler into a mobile entertainment center that keeps passengers engaged for hours.
This comprehensive guide will walk you through everything you need to know about using your Pacifica’s rear entertainment features effectively.
Understanding the Uconnect Theater System
The Chrysler Pacifica’s rear seat entertainment system, called Uconnect Theater, features dual 10.1-inch HD touchscreens mounted on the back of the front seat headrests. These screens can operate independently, which means your kids can watch different content without fighting over what to watch.
The system includes wireless streaming capabilities, HDMI inputs for gaming consoles, and on newer models, Amazon Fire TV integration. Two pairs of wireless headphones come standard, keeping the driver’s area peaceful while passengers enjoy their entertainment.
Basic System Startup and Navigation
Getting started with the Uconnect Theater system is simple once you know where everything is located. The power buttons are located on the bottom edge of each screen. Press and hold the power button for about two seconds to turn on each display.
You’ll see the main menu appear with large, easy-to-navigate icons. The home screen shows options for streaming apps, HDMI inputs, system settings, and any connected devices. Each screen operates independently, so you’ll need to set up each one separately if passengers want different content.
The touchscreen interface responds well to finger touches, but you might need to press slightly firmer than you would on a smartphone or tablet. This is normal for automotive touchscreens and helps prevent accidental inputs while driving over bumps.
Connecting to WiFi for Streaming
To access streaming apps and online content, you’ll need to connect the system to WiFi. You can use your vehicle’s built-in hotspot if you have an active data plan, or connect to your smartphone’s mobile hotspot.
From the main menu, tap the Settings icon, then select “WiFi.” The system will scan for available networks. Select your preferred network and enter the password using the on-screen keyboard. The connection process typically takes 30-60 seconds.
Keep in mind that streaming video uses significant data. A typical movie can consume 1-3 GB depending on quality settings. If you’re using your phone’s hotspot, monitor your data usage to avoid overage charges.
Using Built-in Streaming Apps
Newer Pacifica models with Amazon Fire TV integration come with popular streaming apps pre-installed. You’ll find Netflix, Disney+, Hulu, Prime Video, and other major services available from the home screen.
To use these apps, you’ll need active subscriptions to the services. Tap the app icon and sign in using your existing account credentials. The system will remember your login information for future use.
Video quality automatically adjusts based on your internet connection strength. In areas with weak cell signal, the system will reduce quality to maintain smooth playback. You can manually adjust quality settings in most apps if needed.
Connecting External Devices via HDMI
Each rear screen has an HDMI input that accepts signals from gaming consoles, tablets, laptops, or other devices. The HDMI ports are located in the center console area between the second-row seats.
You’ll need to bring your own HDMI cable, as one isn’t included with the vehicle. A standard 6-foot HDMI cable works well for most setups. Connect your device to the HDMI port, then select “HDMI” from the screen’s main menu.
Popular devices that work well include Nintendo Switch, iPad with HDMI adapter, gaming laptops, and portable media players. The system supports up to 1080p resolution, which provides crisp, clear images on the 10.1-inch displays.
Setting Up and Using Wireless Headphones
The Pacifica comes with two pairs of wireless headphones that connect via infrared technology. This older wireless standard means the headphones only work with the vehicle’s entertainment system, but they provide reliable connection without interference.
To use the headphones, first make sure they’re charged using the included charging cables. Put the headphones on and they should automatically connect to the nearest active screen. You’ll see a headphone icon appear on the screen when they’re connected.
Each pair of headphones has its own volume control, independent from the screen’s volume settings. There’s also a channel selector switch that lets you choose which screen’s audio to listen to. This feature is particularly useful when the screens are showing different content.
Managing Audio Output Options
The Uconnect Theater system gives you several audio output choices. By default, audio plays through the wireless headphones when they’re connected and turned on. You can also route audio through the vehicle’s speakers if desired.
To change audio settings, tap the Settings icon on either screen, then select “Audio.” You’ll find options to route sound to headphones, vehicle speakers, or both. The dual-zone audio control lets each screen have independent audio routing.
When using vehicle speakers, the system automatically adjusts volume levels to ensure the driver can still hear important vehicle sounds and navigation prompts. You can fine-tune these levels in the audio settings menu.
Troubleshooting Common Issues
If a screen won’t turn on, first check that the vehicle is running or in accessory mode. The entertainment system won’t operate when the ignition is completely off to preserve battery life. Press and hold the power button for a full three seconds if the screen seems unresponsive.
WiFi connectivity problems are usually resolved by forgetting and reconnecting to your network. Go to Settings, select WiFi, find your network, and choose “Forget.” Then reconnect using your password. Restarting your phone’s hotspot can also help establish a stronger connection.
HDMI connection issues often stem from loose cables or incompatible devices. Make sure the HDMI cable is firmly seated in both the vehicle port and your device. Some tablets and phones require specific HDMI adapters to work properly.
Maximizing Battery Life and Performance
The rear entertainment screens draw power from the vehicle’s electrical system, but they can drain the battery if used extensively with the engine off. For extended viewing sessions during stops, consider running the engine periodically to recharge the battery.
Each screen has brightness settings that can be adjusted for comfort and battery conservation. Dimmer settings use less power and may be more comfortable for viewing in dark conditions. The auto-brightness feature adjusts based on ambient lighting.
Closing unused apps and disconnecting from WiFi when not needed helps preserve both vehicle battery and mobile data. The system will automatically enter sleep mode after 30 minutes of inactivity.
Advanced Features and Tips
The system includes parental controls that let you restrict access to certain apps or content ratings. These controls are accessible through the Settings menu and can be password-protected to prevent changes by young passengers.
You can customize the home screen layout by moving frequently used apps to the front page. Press and hold any app icon, then drag it to your preferred position. This makes it easier for kids to find their favorite entertainment options.
The system remembers recent activity and will often resume where you left off when restarting. This includes partially watched movies, game progress, and WiFi connections. However, some streaming services may require re-authentication after extended periods.
Maintenance and Care
Keep the screens clean using only microfiber cloths and screen-safe cleaning solutions. Avoid household cleaners that might damage the anti-glare coating. The screens can be wiped down while the system is off, but avoid getting moisture in the surrounding bezels.
The wireless headphones should be charged regularly, even during periods of non-use. Store them in a cool, dry place and avoid leaving them in hot vehicles for extended periods. The charging ports are located on the right ear cup of each headphone set.
Software updates for the Uconnect Theater system are typically delivered over WiFi automatically. You can manually check for updates in the Settings menu under “System Information.” Updates can take 15-30 minutes to download and install.
Frequently Asked Questions
Can I use my own headphones instead of the included wireless ones?
The system works best with the included infrared wireless headphones. While you could use wired headphones by connecting them to a device plugged into the HDMI port, there’s no standard headphone jack on the entertainment screens themselves. The included headphones are specifically designed to work with the dual-screen setup.
Will the entertainment system work while driving?
Yes, the rear seat entertainment system operates normally while the vehicle is in motion. This is one of its key advantages over many aftermarket systems. However, the driver cannot view the rear screens while driving, which helps maintain focus on the road.
How much data does streaming typically use?
Data usage varies significantly based on content and quality settings. Standard definition video uses approximately 1 GB per hour, while high definition can consume 3 GB or more per hour. Most streaming apps allow you to adjust quality settings to manage data consumption. Downloaded content uses no additional data during playback.
Can I connect multiple devices to one screen?
Each screen has one HDMI input, so you can only connect one wired device at a time. However, you can switch between the HDMI input and built-in streaming apps without disconnecting cables. Some HDMI switches can expand connectivity options if you need to connect multiple devices frequently.

Leave a Reply